Shell Script Basics
Shell 是什麼
一台電腦的組成到運行可以想像成有硬體組成(Hardware),核心(Kernel),以及殼層(Shell)。
那麼使用者所接觸到的就是殼層這部分,這一圈可能有CLI(command-line interface)或GUI(Graphical user interface),就如同我們所使用的terminal或者任何圖形化介面等。
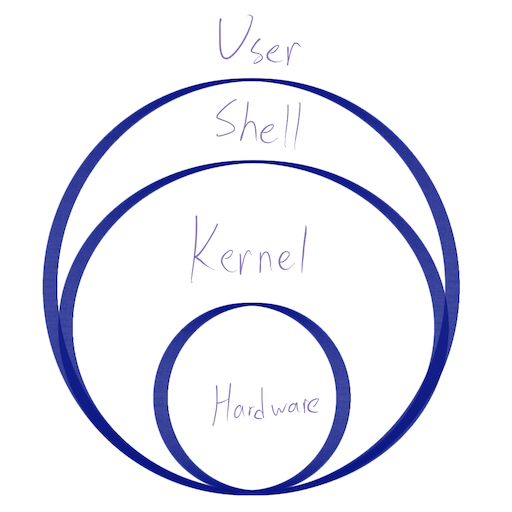
而Shell script就是我們透過殼層與內核溝通的語言,藉由殼層翻譯給內核,內核再去驅動我們硬體做出相對應指令。
那為什麼我們要了解這項語言呢?
主要是我們很多自動化動作可以藉由Shell script來達成,簡單的就是開機時,系統內的Shell初始電腦硬碟,開始調用CPU以及Memory輸出畫面到我們螢幕上。
另一個例子像是Hexo在搭建部落格時,有時候我會先用hexo server --draft來查看剛寫好的文章排版,但要先執行clean以及generate的動作,前後雖然只有3個指令,但有時校稿n次,那麼我就要執行n*3次的指令輸入。
因此簡化的方式就是寫一個bash,讓我開啟本端伺服器時不需要輸入那麼多指令並且等待。
1 |
|
Basics
當你Google Shell script,網路上已經有很多寫好的文章,而這篇文章想要濃縮其精華,做成一篇QRG(Quick Reference Guide)。
Basic of the basic commands
在真正開始有scripting之前,先了解一些組成單元,也就是基本操作,會這些操作之後就只是把指令串接起來而已。
pwd
The pwd utility writes the absolute pathname of the current working directory to the standard output.
pwd會將當前位置做出output到終端機上。
ls
ls 會將當前位置的檔案列出。 常見的當配為ls -a來顯示出隱藏的檔案及資料夾,ls -R遞迴全部底下檔案。
du
Disk usage. 列出底下檔案大小。
常見搭配為du -h為human-readable,後啜會加上單位方便判讀; du -s會將符合的當作一個entry,不會往下去做顯示,也等同於-d 0做depth = 0的意思。
另一個是挑檔案大小du -t [number],如果數值為正數,那麼大於這個數值的檔案會顯示出來,如果數值為負數,那麼小於這數值的檔案會被顯示出來。
cd
change directory,這中文我也不知道叫什麼😂,就是更換你的位置。
單純cd會跳回user的資料夾底下,cd [directory]會切換到底下directory的位置,cd ..會回到上一層。
在使用cd時,可以一連串往下走,也就是cd first/second/third,每按下tab就會autosuggest以及顯示出當前有的entry。
man
當不知道指令如何使用時,呼叫man [command]就會跳出該指令的mannual囉。
top
類似工作管理員,監控目前的程式資源消耗。top -o [key]以key為主降序排列,top -user [username]查看某使用者的程序。
mkdir
make directory,新建資料夾。
touch
touch – change file access and modification times
對於更改時間,其實更常用來建立新檔案,touch [filename.extension]。
chmod
chmod – change file modes or Access Control Lists
改變檔案的mode或檔案存取權限。一個檔案可以被使用者(user)、群組(group)、其他(others)做出讀取(r)、寫入(w)、執行(x)。chmod我分成兩種方式,implicitly以及explicitly.
Explicitly即是把目標對象以及權限寫清楚,chmod u=rwx即是使用者可以有讀取、寫入並且執行的權限。
又或者chmod g=u-x代表群組等同於使用者權限但扣除執行的權限。
Implicitly則是用數字來表示權限等級,並且依照ugo的順序。chmod 744即是給予使用者全部權限,其餘只有讀取的權限。
| 讀取 Read | 寫入 Write | 執行 Execute |
|---|---|---|
| 4 | 3 | 1 |
echo
echo就如同print或printf,將字串輸出至終端。
sudo
以super user的權限執行指令。
在某些場合下,指令可能需要最高權限來執行,sudo [command]就會以超級使用者來跑,但為了電腦安全,通常會跳出需要輸入電腦密碼以確保安全。
cat
The cat utility reads files sequentially, writing them to the standard output.
cat會將檔案內容輸出至終端,可以當作類似預覽功能。
mv
移動檔案或更改檔名。
mv [file1] [file2]或mv [file] [directory]
cp
複製檔案,如同mv寫法
find
如同英文,尋找目標檔案。find . -empty 會找尋當前底下所有空白檔案。find . -name "*.fits" -exec rm -rf {} \; 找尋底下所有副檔名為fits的檔案,並且執行rm -rf,也就是刪除檔案。find / -type d找尋家目錄底下所有為目錄的位置。find . -size 2k找尋檔案大小等於2kb。size可以使用+-來表示大於小於,e.g., -size +20M -size -5G在20MB到5GB這範圍。
tree
list contents of directories in a tree-like format.
以樹狀圖表示底下檔案分佈,以我其中一個ios專案來舉例:
1 | . |
常見的選項是tree -L 2,Level如同Depth,決定往下的深度。tree -d只顯示目錄。
nohup
這項指令通常在如果要跑的指令很久,要將東西放在伺服器上跑時,避免使用者登出後程式停止執行。nohup [command] &,這裡的&是將指令放在背景執行。
通常我習慣加上>將輸出資訊導到我要的檔案,i.e.,nohup [command] [args] > log.txt &
Scripts
第一行開頭會用Shebang或稱Hashbang,由#!所組成的宣告,代表著我們接下來要使用哪個直譯器執行底下指令,後面接的路徑你可以藉由which bash來查詢。
比如我的就是寫#!/bin/bash
Variable
要注意assign變數時,等號左右不可空格。Var="Tyler", echo "My name is $Var"
Input
讀取input使用read,其寫法可以直接read [Var]或帶有提示文字read -p [Text] [Var]
if
1 |
|
1 |
|
case
1 |
|
for loop
1 |
|
while loop
1 |
|
function
1 |
|
Control operators
- ; semi-colon會讓前一個指令結束後,接著跑下一個指令。
command1 ; command2 - & 會讓指令在背景處理。
command1 & - && 意同and, 如果前一個指令完成,那麼第二個指令才會運作。
command1 && command2 - || 意同or, 如果前一個指令失敗,那麼第二個指令才會運作。
command1 || command2 - | 這會將第一個指令的輸出傳到下一個指令當作輸入,形成pipeline,又稱pipe operator.
command1 | command2
Redirection operators
- < 給予command input
command < file,檔案會以讀取模式打開。 - <> 如同<,但檔案會以讀取寫入打開。
- > 將指令回傳值輸出到檔案中。
command > log.txt - >| 如同>,但會覆寫檔案。
- >>如同>,但會以附加方式寫進檔案。
Summary
這小短篇算是把常用實用的指令給涵括,還有很多指令沒提到,但我想這些指令大概夠我碩士畢業了😂
在shell script上也許會有另一篇advance的筆記)?
References
導向運作子
Shell script 個人筆記
「程式筆記」Shell Script 簡易筆記
Shell Scripting Crash Course - Beginner Level